


This post was originally shared at Positively Splendid.

I had whipped up a fun pleated ribbon cuff with a little bit of bling! Want to make one, too? You probably already have the supplies on hand. Gather them up and let's get down to business!

First, you will want to measure your wrist. Multiply that number by four and cut your ribbon to that length. My wrist is 7 inches, so I cut a piece of ribbon 28" long. You can use ribbon of any width, but I found 7/8" to be wide enough to easily pleat.

Heat seal one end (I use a lighter) and then add your male snap* about 1.5" down.
Fold the end of the ribbon to the back, covering up the back of the snap and stitch it in place using either a sewing machine or a needle and thread.

Fold a pleat up over the line you stitched, making sure that your snap is facing down and pin it in place.

Continue folding up your pleats, pinning each one in place. You can measure if you like, but I just like to eyeball it to save time.
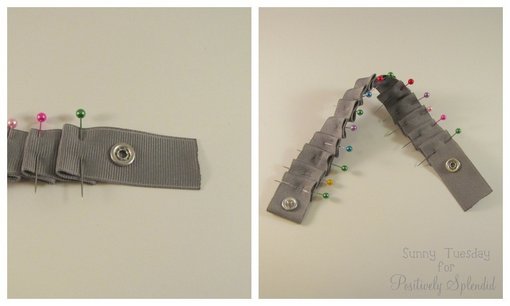
Pleat your ribbon until it fits your wrist. Trim the ribbon down to 2" from the last pleat. Heat seal the end and add your female snap* about 1.5" from the end. Make SURE that you have it facing the opposite direction from your male snap.

Now flip it over so the female snap is facing down. Fold the end up over the back of the snap and tuck it into the last pleat. Stitch the end in place. I actually unpinned the last pleat to stitch the end down and then pinned it back up.

Stitch a line straight down the middle, from snap to snap. Try to keep it as centered as possible.

Now you will want to stitch your rhinestone trim down. I just stitched right between each stone, tacking the trim to the bracelet. Don't worry too much about how pretty it is on the back.

Keep going until you get about 1/4" from the snap on the other end. You can stop here if you don't care what the inside looks like. :)

If you DO care what the inside looks like, flip it over and you'll see all your little stitch marks. I cut a piece of velvet trim to length and hot glued it on to finish the inside.

These pleated ribbon cuffs are so quick & easy to make. Try out different ribbons and trims - the possibilities are endless!
*Don't have snap pliers? No worries! You can use sew-on snaps or velcro or leave long tails at each end and tie it on.
If you make a pleated ribbon cuff, come post your pic on the Sunny Tuesday facebook page - I would love to see it!
I'll see y'all next month with another project. If you miss me in the meantime, scoot on over to Sunny Tuesday. :)


3 comments:
A cute and easy accessory! Plus, ribbon is always on sale somewhere! I made this and love it!
Too adorable! I saw that you pinned my breakfast nook, so I thought I would come by and say Hi! So glad I did...I'm your newest follower!
Jessica @ Mom 4 Real
What an awesome and fashionable idea! love it!
Post a Comment