






Showing posts with label Kitchen Experimentation. Show all posts

6/7/11

Chocolate Covered Pretzels

I initially posted this tutorial over at The Scrap Shoppe in April and now I'm bring it on over here to you!  If you love simple and yummy, this is the thing for you!

I'm going to share with you how to make gourmet candy pretzels!  I recently made these as hostess gifts for my baby shower and they were a huge hit!  Enough talk, let's get down to the nitty gritty:

Stuff you'll need:


Pretzels: I used Snyder's Old Tyme pretzels.  They're the perfect size and thickness.
Chocolate almond bark
White chocolate chips
Toppings: Heath toffee chips, sprinkles, crushed oreos, crushed M&Ms and crushed Reese's Pieces (or whatever floats your boat!
Colored candy melts (I used pink)
Wax paper
A bowl or dish for dipping the pretzels
Various kitchen utensils (fork, rubber spatula)

Step 1: Melt your chocolate.


Put your chocolate in a glass bowl or dish and microwave in 30 second intervals, stirring in between, until melted through and smooth.

Step 2: Dunk your pretzel.


Put your pretzel in the dish and push it down so it's fully coated in chocolate.

Step 3: Drain the excess chocolate.


Pull the pretzel out with a fork or tongs and allow the extra chocolate to drip off. 

Step 4: Place pretzel on wax paper.


This can get messy.

Step 5: Sprinkle!


Sprinkle the topping of your choice on your chocolate covered pretzel before the chocolate sets.  OR you can drizzle another coating over the pretzel.  This, too, can get messy!

Once your pretzels have set up, you can take them off the wax paper and plate them up. If you're giving them as a gifts, stack them up in a clear cellophane treat bag and tie with ribbon.


Go crazy with the combinations!  From top to bottom, my combinations are:


1. Chocolate covered, drizzled with pink candy coating
2. Candy coating covered with sprinkles
3. Chocolate covered with Reese's Pieces
4. Plain, drizzled with chocolate, white chocolate and candy coating
5. Chocolate covered with sprinkles
6. White chocolate covered with Oreos
7. Chocolate covered with M&Ms
8. Chocolate covered with Heath toffee bits

10/7/09

Tiny Pies 2009


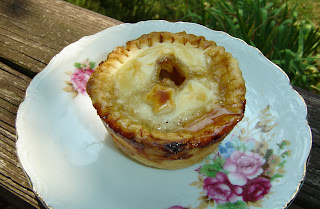
I made them for my cast. They went over well. The apples were store-bought this year. Our apple tree was fruitless. (ba-dum-dum)
Edited to add:
Here are the instructions for these little pies.
My tips:
-I use refrigerated pie dough. I'm lazy. I also cut the circles with a small pyrex bowl (shells) and a drinking glass (tops). Each box makes about 6 pies, if you squish it back together and roll it out over and over.
-I load a muffin tin down with non-stick spray. Don't know if you're supposed to, but it makes clean-up a heck of a lot easier!
-I cut Granny Smith Apples into little bitty pieces and just mix in sugar, cinnamon and a little lemon juice till I think it looks good.
-I brush the edges with egg wash and fold them over the top to prevent the insides from bubbling everywhere and making a mess. I also brush the tops with egg wash to make them pretty.
-I use a fondant cutter to vent the top, but you could just stab it with a knife a couple times.
-I put them in the oven for about 20 minutes or until the filling is bubbling through the top and they look goldenish.
Please feel free to email me with any questions! sunny dot tuesday at yahoo dot com.

10/6/09

Candy Corn Brownies!!!


After a couple failed attempts at some sort of candy corn confectionery, I finally had a success! The cookies weren't strong enough, but my oh my, the brownies were the perfect partner for the candy corn.

What you'll need:


Step 1:
Mix the brownies according to the package instructions.

Step 2:
Put the brownies in the oven. Take them out 10 minutes BEFORE the package instructions. They won't be all the way done.


Step 3:
Cover the brownies with a single layer of Candy Corn. I use Brach's because it's my favorite. Here, I used Candy Corn and Indian Corn.


Step 4:
Put the dish back in the oven for 10 more minutes or until done. You should be able to find a little open space to stick a toothpick in to check.

Step 5:
The candy corn will be melted. It's okay if it's bubbling on the sides. Act quickly! You have to hurry and spread it out before it starts to cool down. Don't over spread or all the colors will mix. You want it to look marbled. Unless you want it all one color, in which case, spread away!


Step 6:
This is the most difficult step by far. Let it sit and cool. Once it has cooled completely, you can cut it up! Enjoy!

12/10/08

Seven x Seven - Tasty Treats

Tis the season to gain 5 pounds.

1. Christmas Butter Cookies - These cookies from daily yarns 'n more look delicious! Two sticks of butter! I think that's really all I have to say, but I'm sure once you add icing, they're downright sinful.

2. Cashew-Caramel Cookies - I love cashews and can't wait to try these cookies from plumpudding. They sound absolutely decadent.

3. Krispy Kreme Cheesecake - This looks awesome. And by awesome, I mean disgusting. And by disgusting, I mean I'm about to hop in the car to go get the ingredients now because I can't wait to try it. Thank you, Deep Fried Kudzu. I now hate you. And by hate you, I mean love you.

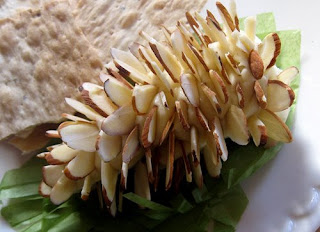
4. Pinecone Cheese Ball - Anyone who knows me knows I love cheese! This is such a cute idea for winter and looks simple. From My Paper Crane.

5. Chocolate Marshmallow Surprise Cookies - I think the title says it all, there. I'm really digging the pink sprinkles on these cookies from The Apronista. For more recipes, visit her food blog here.

6. Chicken Pot Pie Soup - It's pouring rain outside and this sounds like just the thing to warm my bones! From Joyful Abode.

7. Christmas Tree Pops - What kind of treat post would this be if I didn't include Bakerella? She's got instructions for these and about a million other variations, so go check it out!

12/8/08

Yummy Quick Tip 1

Next time you make a batch of brownies, jazz them up by covering the top with York peppermint patties for the final ten minutes. When the brownies are done, swirl the melted Yorks with a knife and enjoy!

Thanks to my friend, Jane Elise for the idea.

11/15/08

Saturday Seven - My Favorite Recipes

I know cooking doesn't exactly fall under crafting, but since the holidays are upon us and we'll all be doing quite a bit of cooking, I figure it works.

I've personally made all of these recipes. And I'm not so gifted in the kitchen, so if I can do it, you can too! Also, I'm really picky so chances are you're kids will eat this stuff, too.

1. Chef Joe's Mac & Cheese - I found this one on the Food Network site and let me tell you, I am so happy I did. It's delicious. The paprika and cayenne pepper add an unexpected (but not too exotic) punch.

2. Hash brown Casserole - This comes from my church cookbook. It doesn't have onions, but it does have cheese. Lots and lots of it!

30 oz bag shredded frozen hash browns
2 C shredded cheddar cheese (I've also used the casserole blend, which is really good)
8 oz sour cream
1 can cheddar cheese soup
1 can cream of chicken soup (use cream of mushroom for a vegetarian casserole)
1 stick butter
approximately 1 C crushed corn flakes

Mix first 5 ingredients in a large bowl. Add melted butter. Spread into 9x13 dish. Top with crushed corn flakes. Bake at 350 degrees for 1 hour.

*For best results, use Campbell's brand soups. Seriously. They're much better than the store brand. And for heaven's sakes, people, don't use fat free, low sodium or fake butter. It's much better to have a smaller serving of something fantastic than a regular serving of a so-so dish.

3. Great Pumpkin Cookies - My mom always made these for us in the fall. She'd make them really big. I think they count as a vegetable serving, personally.

2 C flour
1 C uncooked oats (quick or old fashioned)
1 tsp baking soda
1 tsp cinnamon
1/2 tsp salt
1 C softened butter
1 C packed brown sugar
1 C sugar
1 egg
1 tsp vanilla
1 C solid pack (canned) pumpkin
1 C semi-sweet chocolate chips

Combine first 5 ingredients. Cream butter & sugars in a large bowl, beating until light & fluffy. Add egg & vanilla; mix well. Alternate additions of dry ingredient mixture and pumpkin, mixing well after each addition. Stir in morsels. Drop onto greased cookie sheet. Bake at 350 degrees for 20-25 minutes.

4. Chocolate Chip Cheese Ball - I have my sister-in-law, Julie, to thank for this one!

1 8 oz package cream cheese
1/2 C butter (one stick)
1/4 tsp vanilla
2 Tbs brown sugar
3/4 C confectioners sugar
3/4 C mini chocolate chips
3/4 C finely chopped pecans (or more chocolate chips)

various crackers/cookies for dipping*

Beat softened cream cheese, butter, and vanilla until creamy. Slowly add sugars until blended. Stir in chocolate chips. Place mixture onto a piece of plastic wrap and form into a ball. Refrigerate for 1 hour. Roll ball in pecans (or chocolate chips). Serve with graham crackers.

*I like to use graham cracker sticks in honey and chocolate flavors. If you have other ideas, I'd love to hear them!

5. Cheese Fondue - I love this stuff. I will dip anything I can find in this cheese fondue.

1 C half & half
1/2 Tbsp Worcestershire sauce
1 tsp dry mustard
3 C shredded cheddar cheese
1 1/2 Tbsp flour
salt

Heat half & half, Worcestershire sauce and dry mustard. Toss cheese with flour. Gradually add cheese, stirring until melted between additions.

*I love french bread with this, but fresh veggies and apples are a healthier (and also awesome) option!

6. Really Super Cheesy Potato Soup - This is one of my only recipes that I can truly claim as my own. I just kind of threw it together and used whatever ingredients and techniques that seemed like a good idea at the time. And it actually turned out really good! My husband likes it, but hates when I make it. He swears I get cheesy potato soup into every crevice of the kitchen.

6 cups diced & peeled potatoes
5 cups chicken broth (I use 5 cups water + 5 tsp chicken bullion granules)
dash of onion salt
dash of garlic salt
dash of kosher salt
dash of fresh ground black pepper
1 can cheddar cheese soup
2 C shredded cheese (use any you want - I usually use cheddar, but I've also used shredded Velveeta) plus a little extra for garnish
Whole milk to taste
Cooked crispy bacon

In a crock pot, add potatoes, chicken broth, onion salt, garlic salt, pepper & salt. Cook on high for 4-6 hours or until potatoes are tender. To speed up the process, sometimes I'll put the diced potatoes in the microwave for 5-7 minutes before adding to the crock pot.

Start this next step no more than an hour before you're ready to eat.

Remove 1-2 cups of the diced potatoes. Here's where the fun begins! Add the cheddar cheese soup and get out your immersion blender (hand mixer). If you don't have one of those, I supposed you could use a wire whisk. Blend until smooth. Add in shredded cheese and stir until melted. Add milk until you've reached your desired consistency.

Serve each bowl topped with crispy bacon crumbles and shredded cheese and along with some warm crusty bread. If you stir the bacon in too long before serving, it gets (for lack of a better word) soggy. Which is gross. So don't do that.

To reheat, just turn the crock pot back on or nuke it in the microwave. Add milk to thin it out.

7. Scotcheroos - My grandma used to make these and send them to me in are packages in college. Once, my Aunt Janet caught the stove on fire making these. I'm apparently the only one who remembers that, though, so it may have just been the overactive imagination of a 6 year old.

1 C granulated sugar
1 C light corn syrup
1 C peanut butter (I like Skippy for this recipe. I don't know why.)
6 C Rice Krispies

Butter a 13x9 pan, set it aside. Measure Rice Krispies, set aside. Combine sugar and corn syrup into a medium size saucepan and heat on stove till mixture bubbles. Take pan off heat and stir in the peanut butter; when mixed well, add the measured rice krispies. Stir till all rice is evenly coated. Press into buttered pan with a spatula or wet hands when mixture has cooled slightly.

8/19/08

Apples, you say?

Look who decided to pop in this summer!

I must say, we were a little surprised to see them. This is our third summer at our house. Last summer, we had no apples at all and the summer before they were little bitty. This year, however, boy do we have apples! And they are big, a little bigger than my fist. We have no clue what they are, but we googled "poisonous apples" and couldn't find any. We did find a recipe for poisonous apples, but none that are naturally. We figured since we couldn't find any evidence to the contrary, these must be safe to eat! So we got cookin!

Saturday, we made an apple cobbler (sorry, I didn't think to take a pic before it was gone). Paired with Purity Homemade (but not really) Vanilla ice cream, it was yummy! We had a jam-packed Sunday, so no apple goodies. Yesterday we got to work. We thinly sliced three quarts of apples to make apple butter. And then this morning we learned our lesson about trusting online recipes. I don't care what cooks.com says, you can't put apples on high overnight. Unless your overnight is four hours. We now have a crock pot full of burnt apples that I still need to throw away. :(

However, not all bad came of last night's attempt at apple butter. We greatly misjudged how many apples would equal three quarts, so we had a lot left over. I remembered seeing this recipe from not martha. I had originally wanted to try them in the jars, but I couldn't find any small enough. So muffin tin tiny apple pies it was!


Isn't it cuuute? Precious little pie! And honey, was it good! Daniel and I each had one last night and then I had one this morning because when it comes to sweets, I have no self control. They were really easy to make, too. I used refrigerated pie dough and since I don't like to waste something as tasty as pie dough, I made these with the leftovers:

I just mushed all the pie dough scraps into one big ball, rolled it out and cut it into rectangle-ish shapes. Then I sprinkled a cinnamon sugar mixture over all of it and baked it at 400 degrees until they didn't look raw anymore. The original idea was to use them to dip the apple butter, but that didn't work and they're perfectly tasty on their own!



Related Posts Plugin for WordPress, Blogger...